Welcome to the most out of season post ever.
Last Christmas I gave you my h started thinking about building an advent calendar. More specifically I wanted to build a music related advent calendar.
At first I thought about a selection of Christmassy songs, but how many really good Christmas related songs can you think of? It wouldn't last long.
Then Last.fm came to mind.
For the people who don't know what Last.fm is... First of all, thank y'all for making me feel old, but also: it's a service that was big a little more than a decade ago: Napster was already gone, leaving behind a legacy of people listening to digital music, legally or less so. Last.fm offered the ability to keep track of whatever digital track you had listened to. It was so popular Spotify integrated it natively on launch – now the option to connect to Spotify is on Last.fm end, as far as I know.
I started my profile in 2006 and since then everything I listened to that wasn't aired in a public space or on a physical support has been tracked there. A goldmine of data.
I started setting some ground rules:
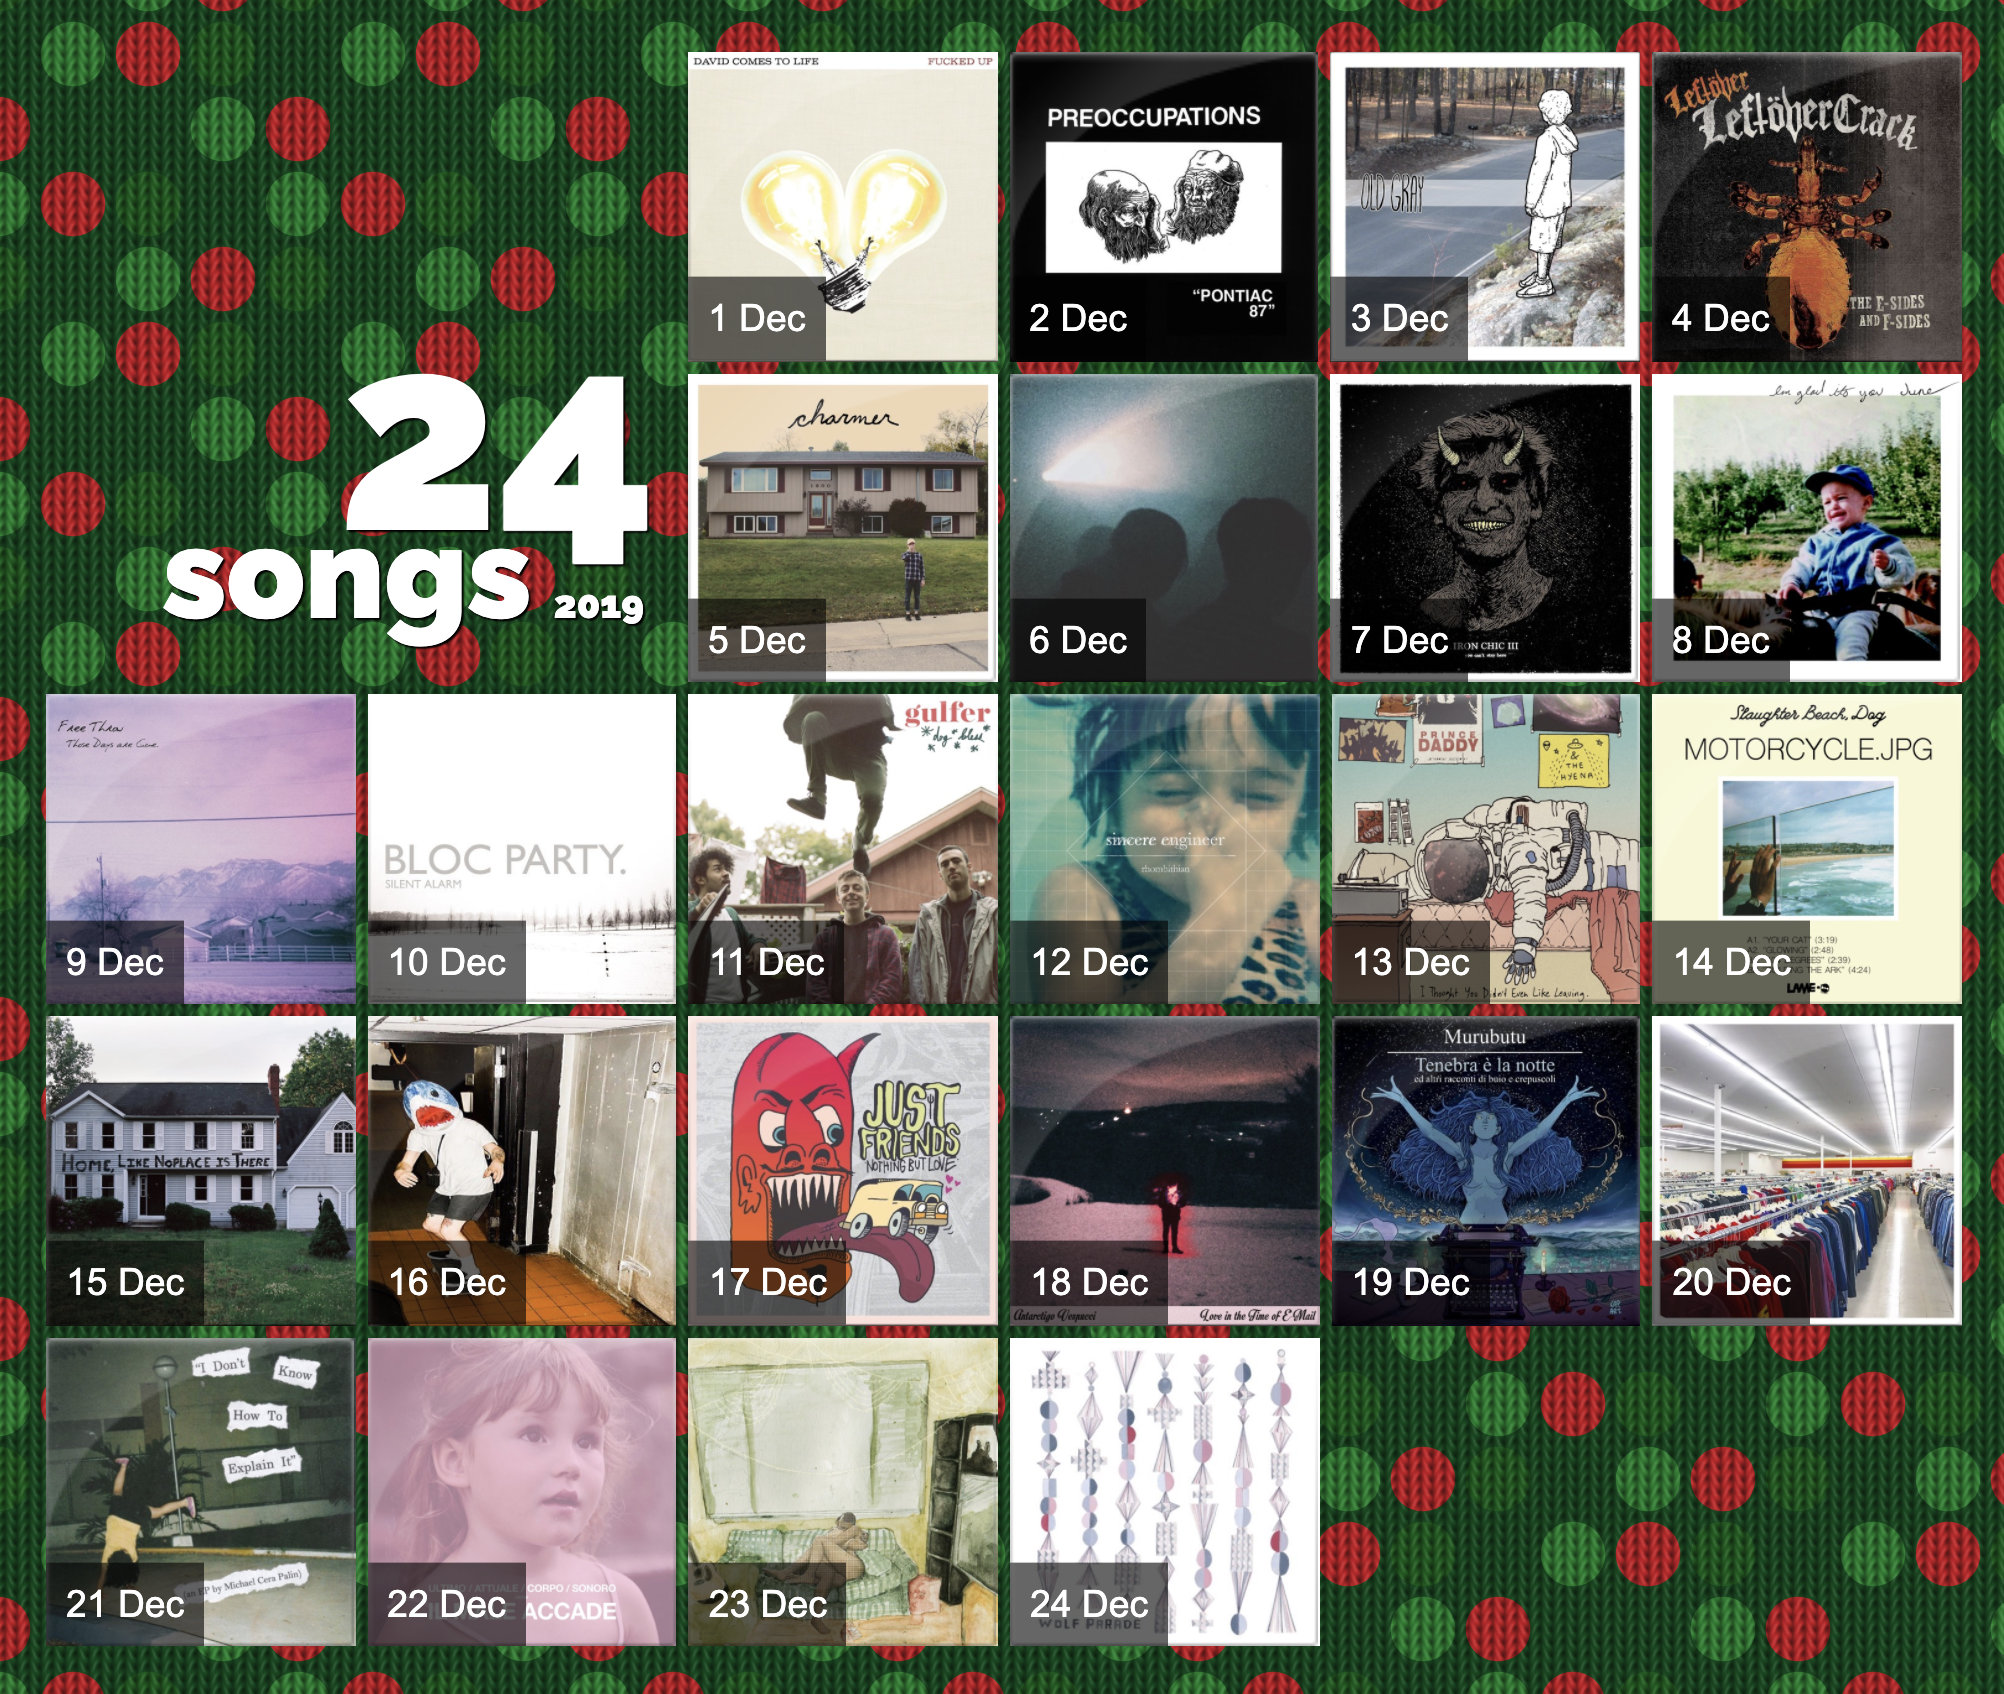
- It should've been a countdown to the most listened song of the year, with a song released each day, as you'd expect by an advent calendar
- I didn't want the same artist repeated twice within the same year list
- I want to offer the ability to listen to the songs via the website
- It had to be a setup and forget sort of things: little maintainance effort involved (apart from the yearly updates of course)
- For the same reason it had to be static, no back-end or database involved
Collecting the data from Last.fm and staticise it in JSON files wasn't too bad, even though I had to use cheerio due to some filtering limitation on their API.
Nothing that a...
const getText = ($, selector) => $.find(selector).text().trim();

// [...]

const $ = cheerio.load(data);
const songs = $(".chartlist-row--with-artist")
  .toArray()
  .map(songDOM => {
    const $song = $(songDOM);
    return {
      img: $song.find(".chartlist-image img").attr("src"),
      title: getText($song, ".chartlist-name"),
      artist: getText($song, ".chartlist-artist"),
    };
  });
...couldn't fix.
Once applied the artist filtering, I could focus on the UI.
The UI and the business logic
What's more Christmassy than a Christmas sweater?
The perfect background:

The layout itself is not technically glamorous – it's all floats, folks, nothing to see there, except maybe the glossiness of the cover, stolen heavily inspired by a Zurb demo. There's some image lazy loading involved, but that's about it.
Having one JSON per year, the logic to show only the right content – the songs for all the previous year, and for the current year only the ones up to the current date – proved itself a little less neat than I hoped but still managable.
const now = new Date();
const initialYear = 2006;
// the finalYear should be the current only if it's December
let finalYear = now.getMonth() === 11
	? now.getFullYear()
	: now.getFullYear() - 1;

export default () => {
  // An array of years desc
  const years = new Array(finalYear + 1 - initialYear)
    .fill(null)
    .map(() => finalYear--);

  // Populating the array with the content of the JSONs
  const data = years.map(year => {
    try {
      const yearData = require(`./data/${year}.json`);
      // If it's the current year, which means it's Dec
      // we want to truncate the content to today
      if (year === now.getFullYear()) {
        yearData.length = now.getDate();
      }

      return yearData;
    } catch (e) {
      return [];
    }
  });

  return [years, data];
};
Audio
The simplest way to get audio on the page was to use YouTube, so I fetched the first search result querying for artist and song title – fixing manually the few odd ones that were not the right match – and built in a modal appearing on click with the video playing. The annoying bit is the ephemerality of YouTube videos: luckily I had something I could use as a test to run every now and then to make sure I could account for video deletions.
const validateVideo = async (song) => {
  const { data } = await axios.get(
    `http://noembed.com/embed?url=${song.video}`
  );

  if (data.error) {
    throw new Error();
  }
}
Click on a cover a nice vinyl animation would trigger too.

@keyframes play {
  0% {
    transform: rotate(0deg);
  }
  100% {
    transform: rotate(360deg);
  }
}

@mixin create-vinyl($color) {
  /**Size**/
  width: 55%;
  height: 55%;

  /**Animation**/
  animation: play 7s .2s infinite;
  transform: rotate(0deg);
  animation-timing-function: linear;

  /**Vinyl**/
  box-shadow: 0 0 0 5px $color, 0 0 0 6px darken($color, 10), 0 0 0 7px $color,
    0 0 0 8px darken($color, 10), 0 0 0 9px $color,
    0 0 0 10px darken($color, 10), 0 0 0 11px $color,
    0 0 0 12px darken($color, 10), 0 0 0 13px $color,
    0 0 0 14px darken($color, 10), 0 0 0 15px $color,
    0 0 0 16px darken($color, 10), 0 0 0 17px $color,
    0 0 0 18px darken($color, 10), 0 0 0 19px $color,
    0 0 0 20px darken($color, 10), 0 0 0 21px $color,
    0 0 0 22px darken($color, 10), 0 0 0 23px $color,
    0 0 0 24px darken($color, 5), 0 0 0 25px $color,
    0 0 0 30px darken($color, 10);
  border-radius: 50%;
}
So far so good.
Also Npm is full of well thought through community creations, and it wasn't hard to find a YouTube component supporting player events – even abstracting a convenient onEnd over the YouTube onStateChange event – enabling to start the next song when the previous finished.
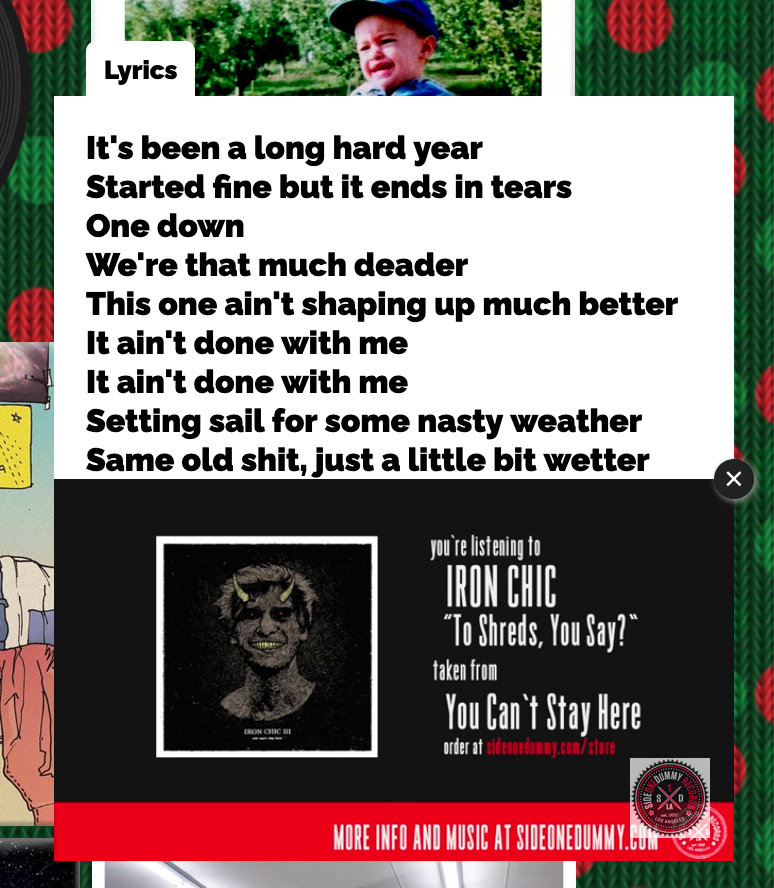
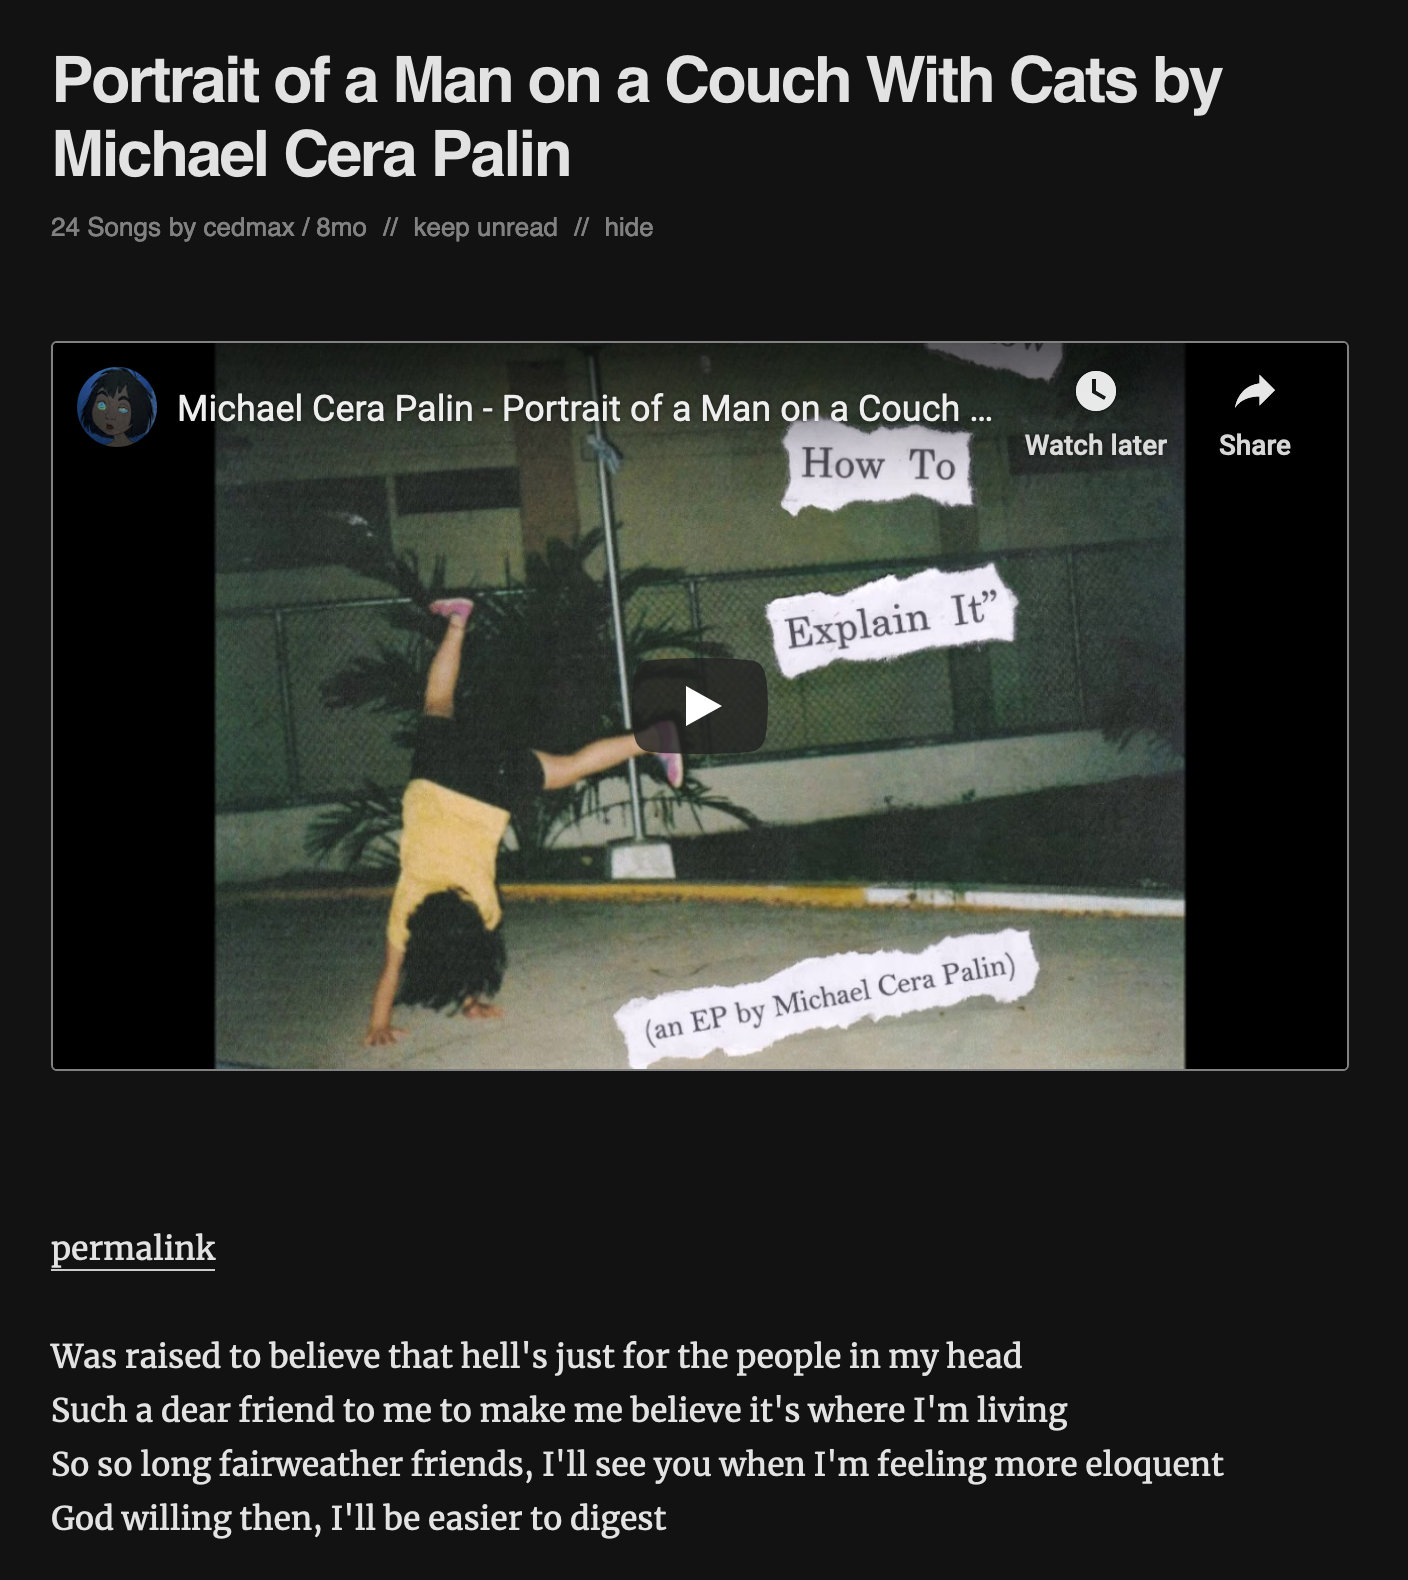
Lyrics and Playlists
Adding the lyrics wasn't initially planned, but I found myself wondering what they were saying, while playing the songs.
The project stayed true to its static nature: the fetching happens when the list gets produced – once a year; it relies on the Genius APIs and every song with lyrics available shows a tab on top of the video.
The bulk of lyrics for 24 songs over 14 years was quite heavy and given the nature of the interaction not worth preloading, so while I staticised the first render with react-snap and embed the initial basic data in the js bundle, I use a useEffect hook to load lyrics only once a song is played.
 useEffect(() => {
    if (selected.id) {
      (async () => {
        try {
          const { data } = await axios.get(`/lyrics/${selected.id}.json`);
          setLyrics(data);
        } catch (e) {
          setLyrics({});
        }
      })();
    }
  }, [selected.id]);
Being all static, the delay is barely noticeable, considering the video has to load too.
Finally with a text to playlist 3rd party tool I ended up creating Spotify playlists for each year and linking them at the end of the lists.
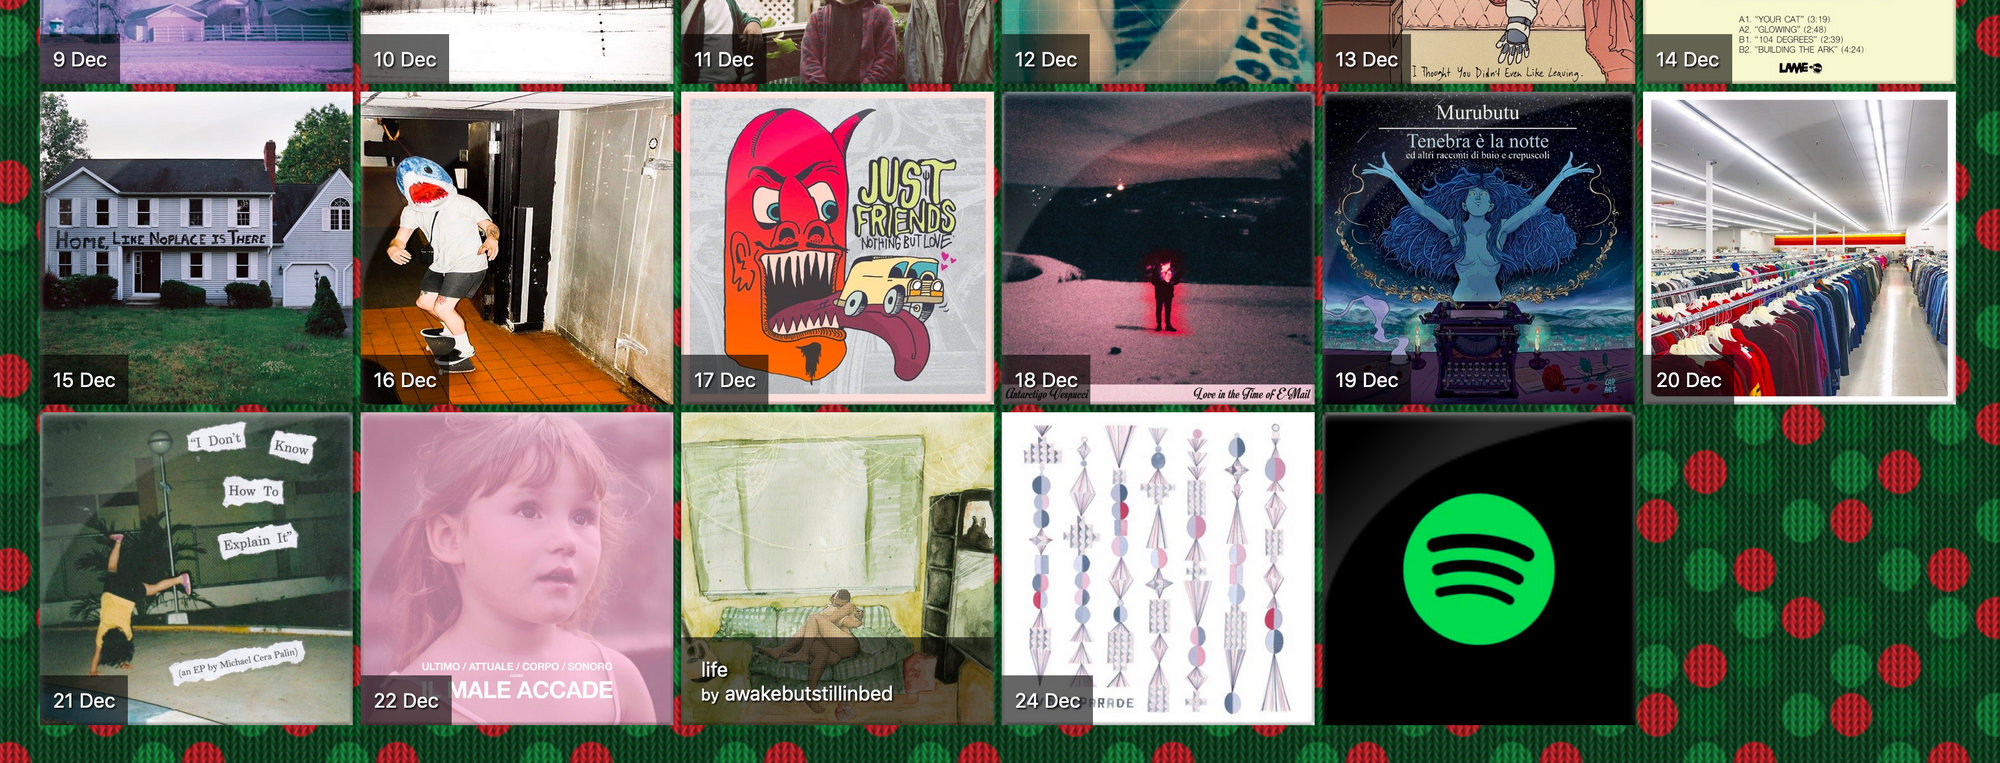
The Feed Rss
Call me old fashioned, but I think a site with daily updates without an RSS feed is a missed opportunity. But there was no back-end: the website so far had been designed as a static CRA with static JSONs being served when appropriate. There was no mean for dynamically loading content.
Except Netlify has its own "lambda" like functions.
And the setup is quite straightforward too: a functions folder at the root of the project will instruct Netlify to upload each subfolder content to a separate function, and even the odd default path can be made more friendly with a _redirect file:
/rss /.netlify/functions/rss 200I had to create an extra build step to provide the data I wanted to show in the RSS, because the path of the site JSONs were not accessible from functions folder once deployed.
const fs = require("fs");
const addLyrics = require('./addLyrics');
const now = new Date();

let year = now.getFullYear();
let currentYear;
let nextYear;

try {
  currentYear = require(`../src/data/${year}.json`);
} catch (e) {
  year = year - 1;
  currentYear = require(`../src/data/${year}.json`);
}

nextYear = require(`../src/data/${year - 1}.json`);

data = addLyrics(data);
extraData = addLyrics(extraData);

fs.writeFileSync(
  "./functions/rss/data.json",
  JSON.stringify({ [year]: data, [year - 1]: extraData }),
  "utf-8"
);
Returning an XML like string was not a problem, copying the structure from a blog and filling the contents, and even the logic to show only the appropriate song was in the site already. Here's the code, if you are curious.
The RSS was ready for Feedly and similar.
The permalink is dealt with a feature of the useState hook: it can take a function to determine the initial state, so by reading the URL path in the form /2019/12/02
const urlTokens = window.location.pathname
  .split("/")
  .filter(token => !!token)
  .map(item => parseInt(item, 10));
I could make sure I would receive it and identify any song as "preselected"
const getPreselected = (year, data, tokens) => {
  if (!tokens.length) return {};

  // validate that's a date in the range considered
  if (isWrongDate(tokens)) {
    return resetUrl();
  }

  // check whether the data exists for the year
  const yearIndex = year.findIndex(item => item === tokens[0]);
  if (isNaN(yearIndex)) {
    return resetUrl();
  }

  // return the selected song entity
  return data[yearIndex][tokens[2] - 1];
};
And assign it to the selected state in my component
const [selected, setSelected] = useState(
  getPreselected(year, data, urlTokens)
);
and, of course, jump to the right position in the page – a bit hacky with the setTimeout and all, but it works pretty well
useEffect(() => {
  const item = document.querySelector(".active");
  if (item && item.scrollIntoView) {
    setTimeout(() => {
      item.scrollIntoView({ block: "center" });
    }, 500);
  }
}, []);
The background & Houdini
Such a simple, on paper, project opened up a lot of opportunities of learning already, but the best was yet to come, which is why I didn't bother to write a blog post until now.
Lately, I've been playing with the idea of adding some spice to the site, and I wanted to have a dynamic background: I could read the cover art dominant colors and rebuild the background with those, on play.
I asked in a couple of communities and MaxArt pointed me to the right direction: I could try to rebuild the pattern with Houdini Paint API.
So I did.
Houdini support is not great yet, but enough for me to play with it and leave the old behaviour as a fallback for the browsers not supporting it.
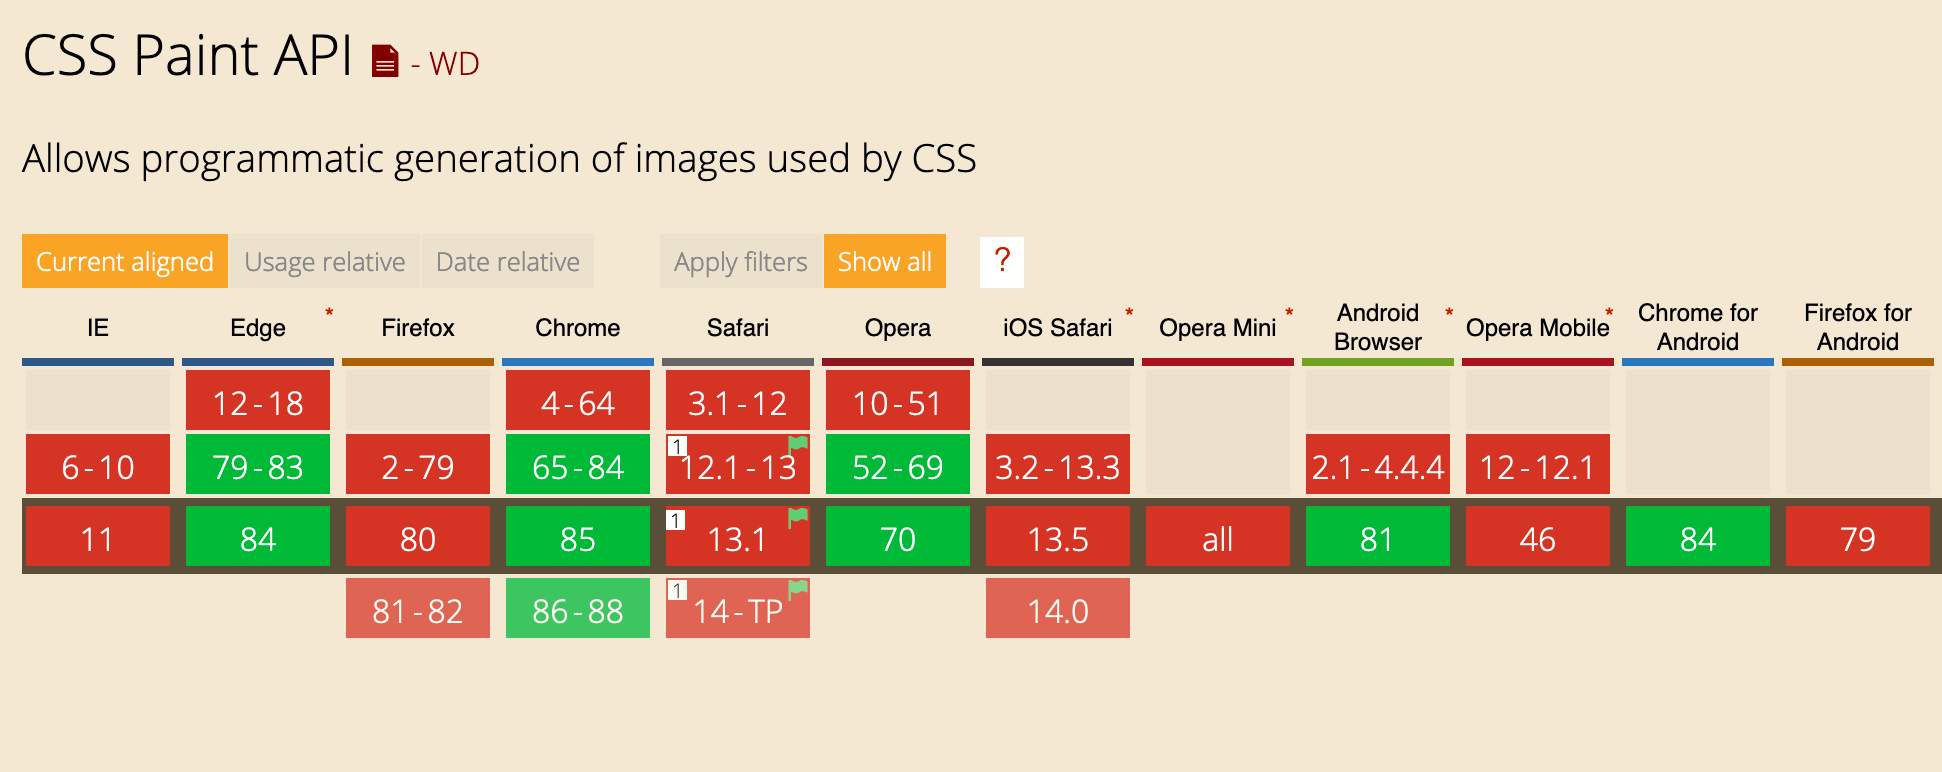
CSS support can be validated with a supports query
body {
  background-image: url("/1b.png");
  background-attachment: fixed;
}

@supports (background: paint(myPattern)) {
  body {
    background-image: paint(myPattern);
  }
}
By using this paint "function", I can then "register" a worker in javascript and use it to draw to a canvas, which will be applied as a background
if ("paintWorklet" in window.CSS) {
  CSS.paintWorklet.addModule("/cssWorker.js");
}
The worker in itself would need to call a function registerPaint with the identifier, in my example myPattern and a js class with a paint method on it.
Something on the lines of
registerPaint(
  "myPattern",
  class {
    paint(ctx, geom) {

    }
  }
);
where ctx is the canvas context and geom contains the width and the height. Working with canvas could be complicated if you've never done it, but they've been around forever and the docs available online are really good.
In order to rebuild this

I had to be able to create circles in the right position and with the right color.
After some trial and error, I managed to come up with this
paint(ctx, geom) {
  const background = 'rgb(0, 74, 30)';
  const main = 'rgb(200, 20, 36)';
  const accent = 'rgb(0, 95, 28)';
  const secondary = 'rgb(0, 129, 45)';
  const transparent = 'rgba(0, 0, 0, 0)';

  // this is the bit I'm most proud of:
  // it helped me visualise what I was building
  const rows = [
    [transparent, transparent, secondary, main],
    [main, accent, transparent, secondary],
    [transparent, secondary, main, accent],
    [secondary, main, accent, transparent],
  ];

  let { width, height } = geom;
  const size = 37.5;
  ctx.fillStyle = background;
  ctx.fillRect(0, 0, width - 0.5, height - 0.5);

  for (let y = 0; y < height + size; y = y + size) {
    for (let x = 0; x < width + size; x = x + size) {
      ctx.beginPath();

      ctx.arc(x, y, size * 0.43, 0, 2 * Math.PI);
      const row = ((y + size) / size) % rows.length;
      const col = ((x + size) / size) % rows[row].length;
      const color = rows[row][col];

      ctx.fillStyle = color;
      ctx.fill();
    }
  }
}
take your time, it took me a bit 😅
After putting all together, I had a static version of my background, and I could apply the appropriate blend mode to it
@supports (background: paint(background)) {
  body {
    background-image: url("/knit.png"), paint(background);
    background-blend-mode: hard-light;
  }
}

The next step was to make it dynamic on click.
I defined my custom css properties with the default color matching the one I wanted:
// for example:
CSS.registerProperty({
  name: '--background',
  syntax: "<color>",
  inherits: false,
  initialValue: 'rgb(0, 74, 30)',
});
and took advantage of another feature of the Paint API
 class {
    static get inputProperties() {
      return [
        "--background",
        "--main",
        "--accent",
        "--secondary",
        "--transparent",
      ];
    }

    paint(ctx, geom, props) {
      const background = props.get("--background").toString();
      const main = props.get("--main").toString();
      const accent = props.get("--accent").toString();
      const secondary = props.get("--secondary").toString();
      const transparent = props.get("--transparent").toString();

      // [...]
   }
}
Now, in theory, after saving the palette of colours for each cover art in my JSON with node-vibrant – which would return me not only the palette, but a very convenient definition of what was vibrant, and what muted and some ligher and darker versions of each – I could change the css variables in an useEffect from my component.
const varNameMap = ['--background', '--main', '--accent', '--secondary']

// [...]

useEffect(() => {
  if (selected.palette) {
    selected.palette.forEach((colorCode, i) => {
      document.documentElement.style.setProperty(varNameMap[i], colorCode)
    }
  } else {
    resetBackground();
  }
}, [selected.palette]);
Except it didn't work: for some reasons I had to force the background repaint. I couldn't find any documentation on how to do so, so I shamefully added a call to this function at the end of my useEffect
const repaint = () => {
  // hiding the body would lose the scroll position so I need to cache it
  const scroll = getScrollTop();
  document.body.style.display = "none";
  // this is the important bit: the browser wouldn't force repaint
  // without this line: the event loop wouldn't re-rendere every style
  // change but only the appropriate ones and reading a style property
  // after setting it forces the application of said change
  getComputedStyle(document.body).display;
  document.body.style.display = "block";
  // and eventually restore the cache position
  window.scrollTo(0, scroll);
};
To my surprise this change is fast enough to not cause flashes of an empty page, even on mobile devices (the ones I tried anyway), but luckily I found a better way to refresh it without involving repainting the whole page:
const alpha1 = `rgba(0,0,0,0)`;
const alpha2 = `rgba(255,255,255,0)`;
let alpha = alpha1;

const repaint = () => {
  alpha = alpha === alpha1 ? alpha2 : alpha1;
  document.documentElement.style.border = `1px solid ${alpha}`;
};
The Paint API seems really powerful, even though there ore still some quirks that need smoothing. I really look forward for it to be more widely embraced by browsers.
The Code
Colours: https://github.com/cedmax/24songs